Pregnancy
- Estimated Date of Delivery (EDD)
Use Naegele’s Rule:- First day of the LMP (Last Menstrual Period) + 7 days, then subtract 3 months.
- Example: If LMP is between June 10 and June 15, take June 10 + 7 days = June 17, then subtract 3 months, resulting in March 17 as the estimated delivery date.
- First day of the LMP (Last Menstrual Period) + 7 days, then subtract 3 months.
- Weight Gain During Pregnancy
- 1st Trimester (First 12 weeks, or 3 months):
- Expect weight gain of about 1 lb per month, totaling 3 lbs by the end of the trimester.
- 2nd and 3rd Trimesters:
- Expect weight gain of approximately 1 lb per week.
- Ideal Total Weight Gain:
- 28 lbs (+/- 3 lbs) is considered normal, meaning weight gain should be between 25-31 lbs over the course of the pregnancy.
- 1st Trimester (First 12 weeks, or 3 months):
- How to Calculate Ideal Weight Gain:
- Formula: Number of weeks pregnant – 9 (+/- 2 lbs).
- This is the weight gain range for a healthy pregnancy.
- If weight gain is +/- 3 lbs from this calculation:
- Assess the patient to determine if there are any concerns.
- If weight gain is +/- 4 lbs from this calculation:
- This could indicate a problem, and a Biophysical Profile (BPP) should be performed to assess fetal well-being.
- Formula: Number of weeks pregnant – 9 (+/- 2 lbs).
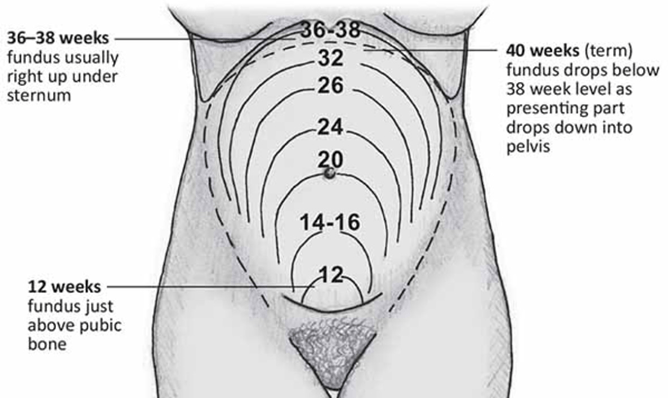
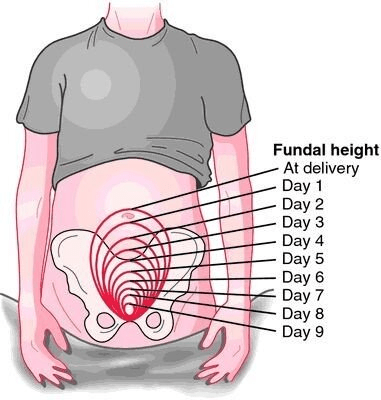
- Fundal Height (Height of the uterus):
- Before 12 weeks: The fundus (top of the uterus) is not palpable.
- At 12 weeks: The fundus can be felt halfway between the pubic symphysis and the umbilicus.
- At 20-22 weeks: The fundus is at the level of the umbilicus.
- Significance of Fundal Height:
- It helps determine the trimester of pregnancy (especially useful if the patient is unconscious).
- If the fundus is larger than expected, it may indicate conditions like a molar pregnancy (a type of cancer).
- 4 Positive Signs of Pregnancy:
- Fetal skeleton visible on x-ray.
- Fetus detected on ultrasound.
- Auscultation of Fetal Heart Rate (FHR) using a doppler, usually heard between 8-12 weeks.
- Palpation of fetal movement by the examiner (note: movements felt by the mother do not count as a positive sign).
Ranges of Values in OB Questions
- There are 3 types of questions related to ranges of values in OB scenarios.
- Example: Fetal Heart Rate (FHR) can be heard between 8 to 12 weeks, and Quickening (first fetal movements felt by the mother) occurs between 16 to 20 weeks.
- When would you FIRST detect? (Earliest possible date)
- FHR: 8 weeks
- Quickening: 16 weeks
- When would you MOST LIKELY detect? (Midway through the range)
- FHR: 10 weeks
- Quickening: 18 weeks
- When should you detect BY? (Latest possible date)
- FHR: 12 weeks
- Quickening: 20 weeks
Probable Signs of Pregnancy
(Some signs may occur due to other conditions, such as cancer.)
- Positive urine/blood hCG test – This indicates pregnancy but could be caused by other conditions like certain cancers.
- Chadwick Sign – A bluish discoloration of the vulva, vagina, and cervix due to increased blood flow.
- Goodell Sign – Softening of the cervix.
- Hegar Sign – Softening of the lower uterine segment.
- Mnemonic to remember the signs: C (Chadwick), G (Goodell), H (Hegar) – The signs progress from the vulva/vagina (C) to the cervix (G) and then to the uterus (H).
Patient Teaching for Prenatal Visits
- Once per month: From the start of pregnancy until 28 weeks.
- Once every 2 weeks: From 28 to 36 weeks.
- Once per week: From 36 weeks until delivery (or week 42). If no delivery by week 42, labor can be induced or a C-section may be scheduled.
- Example: If a woman attends her 12-week prenatal check-up, her next visit would be at 16 weeks.
Lab Values
- Hemoglobin Levels decrease during pregnancy but still remain within tolerable ranges:
- Normal Hemoglobin in non-pregnant women: 12-16 g/dL.
- 1st Trimester: Hb can drop to 11 g/dL and still be considered normal.
- 2nd Trimester: Hb can fall to 10.5 g/dL and still be normal.
- 3rd Trimester: Hb can fall to 10 g/dL and still be normal.
- If Hb falls below 9 g/dL, further evaluation for anemia is needed.
Common Symptoms for Pregnant Women
- Morning Sickness
- Typically occurs during the 1st trimester.
- Treatment: Eat dry carbohydrates (like crackers) before getting out of bed in the morning, but not right before breakfast.
- Urinary Incontinence
- Common during the 1st and 3rd trimesters.
- Treatment: Encourage the patient to void every 2 hours, starting from the beginning of pregnancy until 6 weeks postpartum to manage incontinence.
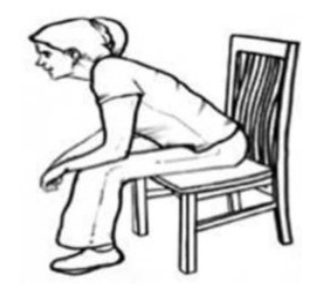
- Difficulty Breathing
- Occurs during the 2nd and 3rd trimesters.
- Treatment: Use the tripod position—lean forward with hands on knees or a desk to relieve pressure and improve breathing, a position often used by patients with respiratory distress (e.g., COPD).
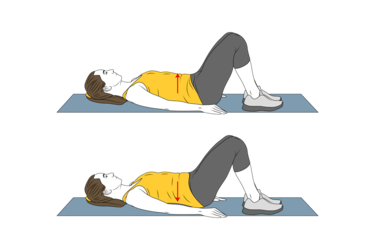
- Back Pain
- Common during the 2nd and 3rd trimesters.
- Treatment: Perform pelvic tilt exercises by placing one foot on a stool and then alternating back and forth to relieve back strain.
Labor and Birth
- The Most Valid Sign of Labor: The onset of regular, progressive contractions is the truest and most reliable indicator that a woman is in labor.
Key Terms to Know:
- Dilation: Refers to the opening of the cervix. It progresses from 0 cm (fully closed) to 10 cm (fully dilated).
- Effacement: This describes the thinning of the cervix. It goes from being thick to 100% effaced, meaning it has become as thin as paper.
- Station: Refers to the position of the fetal presenting part in relation to the mother’s ischial spines (the narrowest part of the pelvis).
- Positive station numbers (e.g., +1, +2) indicate that the baby has passed through the ischial spines and is progressing toward delivery.
- Positive numbers mean positive news!
- Negative station numbers (e.g., -1, -2, -3) mean the baby has not yet passed through the ischial spines and may not be able to be delivered vaginally. A C-section might be necessary in these cases.
- Positive station numbers (e.g., +1, +2) indicate that the baby has passed through the ischial spines and is progressing toward delivery.
- Engagement: This occurs when the fetal presenting part reaches station 0, meaning it is at the ischial spines. This indicates that the baby has descended into the pelvis and is in position for delivery.

Lie
- Definition: The relationship between the spine of the mother and the spine of the baby.
- Vertical Lie: When the spines are parallel (mother’s and baby’s spines aligned). This is good and compatible with a vaginal birth.
- Transverse Lie: When the spines are perpendicular (crossing). This is bad and may require a C-section.
Presentation
- For presentation questions, it’s generally safe to guess between the most common positions:
- ROA (Right Occiput Anterior) – This is the best fetal position.
- LOA (Left Occiput Anterior).
- If unsure, pick ROA before LOA when presented with these options.
Additional Tip
- Before giving digitalis (digoxin), always take an apical heart rate.
4 Stages of Labor
- Stage 1: Onset of Labor
- Priority: Cervical dilation and effacement.
- Phases of Stage 1:
- Phase 1: Latent Phase
- Phase 2: Active Phase (Priority: Pain management).
- Phase 3: Transition Phase (Priority: Monitor dilation, assist with breathing, pain management).
- Stage 2: Delivery of Baby
- Priority: Clear the baby’s airway (suction mouth, then nose).
- Stage 3: Delivery of Placenta
- Priority: Assess the placenta for smoothness and intactness. Ensure the umbilical cord has 3 vessels (2 arteries, 1 vein—“AVA”).
- Postpartum begins 2 hours after the placenta is delivered.
- Stage 4: Recovery
- Priority: Stop bleeding (uterine contraction).
- Recovery lasts 2 hours until the bleeding is controlled.
Phases of Stage 1: Onset of Labor
- Phase 1: Latent
- Dilation: 0 to 4 cm.
- Contractions: 5 to 30 minutes apart, lasting 15 to 30 seconds.
- Intensity: Mild.
- Phase 2: Active (This is the phase to memorize)
- Dilation: 5 to 7 cm.
- Contractions: 3 to 5 minutes apart, lasting 30 to 60 seconds.
- Intensity: Moderate.
- Phase 3: Transition
- Dilation: 8 to 10 cm.
- Contractions: 2 to 3 minutes apart, lasting 60 to 90 seconds.
- Intensity: Strong.
Stage 2: Delivery of Baby
- Steps:
- Deliver the head.
- Suction the mouth, then the nose.
- Check for a nuchal cord (cord around the neck).
- Deliver the shoulders, then the body.
- Ensure the baby has an ID band before leaving the delivery area.
Stage 3: Delivery of Placenta
- Assess: Make sure the placenta is fully intact.
- Check: Confirm the umbilical cord has 2 arteries and 1 vein— “AVA.”
Stage 4: Recovery (Postpartum)
- Priority: Contract the uterus to stop bleeding.
- Postpartum begins 2 hours after the placenta is delivered.
- Monitor the following 4 things every 15 minutes during the 4th stage:
- Vital Signs: Watch for signs of shock (low blood pressure, increased heart rate, cold/clammy skin).
- Fundus Check:
- If boggy, massage it.
- If displaced, have the patient void or catheterize.
- Pads: Monitor bleeding by checking pad saturation. If the pad is fully saturated in less than 15 minutes, this indicates excessive bleeding. A pad should not be fully soaked in less than 1 hour.
- Roll the Patient Over: Check for bleeding underneath her.
Important Notes:
- Phases are not stages—be sure to differentiate between the two.
- Contractions should not:
- Last longer than 90 seconds.
- Occur closer than 2 minutes apart.
- These parameters are critical for identifying uterine tetany or uterine hyperstimulation, which would require stopping Pitocin.
How to Time Contractions
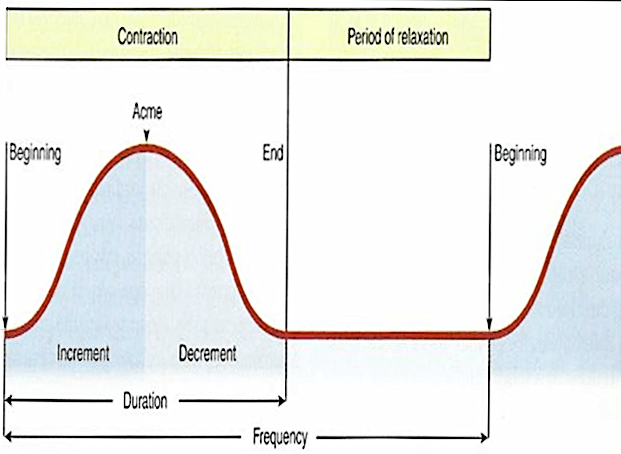
- Frequency of Contractions:
Measured from the beginning of one contraction to the beginning of the next contraction. - Duration of Contractions:
Measured from the start to the end of a single contraction. - Intensity of Labor:
Intensity is subjective. Teach the patient to assess it by placing one hand over the fundus and using the pads of her fingers to palpate the strength of the contraction.
Complications of Labor
(There are 18 in total, but focus on these 3 protocols):
- Painful Back Pain (“OP” = Occiput Posterior)
- “OP” = Oh Pain: This occurs when the baby is in the Occiput Posterior position, causing intense back pain.
- Intervention:
- Position: Place the mother in the knee-chest position.
- 2. Push: Apply counterpressure by pushing a fist into the sacrum to relieve pressure.
- Remember: “OP” = Occiput Posterior.
- Prolapsed Cord – Obstetric Emergency
- This occurs when the umbilical cord comes out before the baby’s head, leading to compression of the cord, which can cut off the baby’s oxygen supply.
- High Priority: Immediate intervention is required.
- Intervention:
- Push: Push the baby’s head off the cord to relieve pressure.
- Position: Place the mother in the knee-chest position or Trendelenburg to prevent further cord compression.
- Interventions for All Other Complications
- Examples: Uterine tetany, maternal hypertension, vena cava syndrome, toxemia, uterine rupture.
- These are managed using the LION protocol:
- L – Left side (position the mother on her left side).
- I – IV (start or increase IV fluids).
- O – Oxygen (administer oxygen).
- N – Notify the healthcare provider (HCP).
- Important: If Pitocin (Pit) is running during any obstetric crisis, the first step is to STOP the Pitocin, then follow the LION protocol.
Administering Systemic Pain Medications in Labor
- Do NOT administer systemic pain medication if the baby is likely to be born when the medication reaches its peak.
- Examples:
- Primigravida at 5 cm dilation: If the IV push pain medication peaks in 15-30 minutes, it is safe to administer the medication because delivery is not imminent.
- Multigravida at 8 cm dilation: If the IM pain medication peaks in 30-60 minutes, DO NOT administer the medication as the baby is likely to be born during the peak, which could affect the newborn.
Fetal Monitoring Patterns
There are 7 fetal monitoring patterns to know. If a pattern starts with “L,” it indicates a bad heart tracing. In these cases, use the LION intervention:
- L: Left side (position the mother on her left side).
- I: IV fluids (start or increase IV fluids).
- O: Oxygen (administer oxygen).
- N: Notify the healthcare provider (HCP).
- Normal FHR: 120-160 bpm.

- Low FHR (<110 bpm)
- BAD
- Intervention: If Pitocin is running, hold Pitocin and perform LION.
- High FHR (>160 bpm)
- Not a crisis, but assess for maternal fever.
- Intervention: Document as an acceleration of FHR and check the mother’s temperature (she may be febrile).
- Baby is within normal limits (WNL).
- Low Baseline Variability
- BAD
- The FHR stays the same without variability, which is concerning.
- Intervention: If Pitocin is running, hold Pitocin and perform LION.
- High Baseline Variability
- GOOD
- FHR is always changing, which is a positive sign.
- Intervention: Simply document the finding.
- Early Decelerations
- Normal, often due to head compression.
- Intervention: Document the finding.
- Variable Decelerations
- VERY BAD
- Indicates a prolapsed cord.
- Intervention: Perform PUSH and POSITION:
- Push the baby’s head off the cord.
- Position the mother in a knee-chest or Trendelenburg position.
- Late Decelerations
- BAD, caused by placental insufficiency.
- Intervention: If Pitocin is running, hold Pitocin and perform LION.
Always remember: One answer that frequently wins is “Check the FHR”.
Stages of Labor & Delivery
2nd Stage of Labor: Delivery of the Baby
- Steps to follow:
- Deliver the head.
- Suction the mouth first, then the nose.
- Check for a nuchal cord (cord around the neck).
- Deliver the shoulders, then the body.
- Ensure the baby has an ID band before leaving the delivery area.
3rd Stage of Labor: Delivery of the Placenta
- Ensure the placenta is complete and intact.
- Check that the umbilical cord has 3 vessels (2 arteries, 1 vein—“AVA”).
4th Stage of Labor: Recovery
- During the 4th stage (the first 2 hours after delivery), you need to perform these 4 things 4 times per hour (every 15 minutes):
- Vital Signs: Assess for signs of shock (BP decreases, HR increases, patient is pale, clammy, cold).
- Fundus:
- If boggy, massage it.
- If displaced, have the patient void or catheterize.
- Perineal Pads:
- Assess for excessive bleeding. If the pad is saturated in 15 minutes or less, this indicates hemorrhage.
- Roll the Patient Over: Check for any bleeding underneath her.
Postpartum Assessment
- Assess every 4-8 hours using the BUBBLE HEAD mnemonic.
- Focus on the three most important areas: Fundus, Lochia, Thrombophlebitis.
BUBBLE HEAD:
- B – Breast: Check for engorgement, nipple cracks, or soreness.
- U – Uterine Fundus:
- The fundus should be firm and located at the umbilicus.
- If boggy and midline: Massage the fundus.
- If boggy and not midline: Catheterize the patient (a displaced fundus indicates a full bladder).
- Postpartum Uterine Tone, Height, and Location:
- Tone: The fundus should be firm, not boggy.
- Height: At the umbilicus on the first day postpartum, then it involutes by about 2 cm per day.
- Location: The fundus should be midline. If not, it suggests the bladder is distended, requiring catheterization.
- B – Bladder: Monitor for distension and ensure regular voiding.
- B – Bowel: Assess for bowel movements and ask about any constipation.
- L – Lochia (Postpartum Vaginal Discharge):
- Know the three types of lochia:
- Rubra: Red (R for red, occurs first).
- Serosa: Pink (semi-red, follows rubra).
- Alba: White (last stage).
- Amount:
- Moderate: 4-6 inch stain on the pad per hour.
- Excessive: Saturating the pad within 15 minutes.
- Know the three types of lochia:
- E – Episiotomy: Check the incision site for signs of infection, healing, or dehiscence.
- H – Hemoglobin/Hematocrit: Monitor levels, especially if there was significant blood loss during delivery.
- E – Extremities: Look for signs of thrombophlebitis (e.g., pain, swelling, tenderness, warmth in legs).
- Best method to assess for thrombophlebitis: Measure bilateral calf circumference (more accurate than Homan’s sign).
- A – Affect/Emotion: Monitor the patient’s emotional status and for signs of postpartum depression or mood swings.
- D – Discomforts: Assess for any general discomforts, including pain from delivery or afterpains.
Key Focus Areas from BUBBLE HEAD:
- Fundus:
- Must be firm and midline.
- If boggy or displaced, intervene by massaging or catheterizing.
- Lochia:
- Monitor the color (Rubra, Serosa, Alba) and the amount (normal vs. excessive bleeding).
- Thrombophlebitis:
- Check the extremities for signs of DVT and measure bilateral calf circumference for the best assessment.
Variations in Newborns
✦ Review the differences between Caput Succedaneum and Cephalohematoma.
✦ Understand the distinction between Physiological Jaundice and Pathological Jaundice.
Normal Skin Conditions in Newborns
- Milia:
- Small white, pinhead-sized, distended sebaceous glands found on the nose, cheeks, chin, and occasionally on the trunk.
- These usually disappear after a few weeks of regular bathing.
- Epstein Pearls:
- Small white or yellow cystic vesicles found on the palate of newborns.
- These are harmless palatal cysts.
- Mongolian Spots:
- Bluish discoloration typically seen in the sacral area of African American, Asian, and Hispanic newborns.
- Important to document the presence to prevent confusion with child abuse.
- Erythema Toxicum Neonatorum:
- Often described as “flea-bitten” lesions; pink rash with firm yellow-white papules or pustules found on the face, chest, abdomen, back, and buttocks.
- Appears 24-48 hours after birth and usually disappears within a few days.
- Hemangioma:
- An abnormal cluster of blood vessels in the skin, often presenting as a birthmark.
- It is common, affecting about 10% of children.
- Vernix Caseosa:
- A fatty, whitish secretion from the fetal sebaceous glands that protects the skin from prolonged exposure to amniotic fluid.
- Found on the newborn’s skin at birth.
- Acrocyanosis:
- Bluish discoloration of the hands and feet, often seen in the first few days after birth.
- It is a normal finding and not indicative of poor oxygenation, respiratory distress, or cold stress.
- Nevi (Telangiectatic Nevi):
- Also known as “stork bites,” these pink, easily blanched skin lesions typically appear on the upper eyelids, nose, upper lip, lower occipital area, and nape of the neck.
- They have no clinical significance and usually disappear by age 2.
- Port-Wine Stain:
- A red to purple birthmark found at birth, often on the face and neck.
- Unlike stork bites, these do not blanch under pressure and may persist without fading.
Caput Succedaneum vs. Cephalohematoma
- Caput Succedaneum:
- Soft tissue swelling of the scalp that crosses suture lines.
- Present at birth and usually resolves on its own within a few days.
- Cephalohematoma:
- A collection of blood between the periosteum and the skull bone that does not cross suture lines.
- Appears after birth and can take weeks to resolve.
Hyperbilirubinemia: Physiological vs. Pathological Jaundice
- Physiological Jaundice:
- A normal occurrence, usually appearing after 24 hours of birth and resolving within about a week.
- Pathological Jaundice:
- Abnormal and appears within the first 24 hours of life. This requires immediate medical attention.
6 OB Medications (3 types)
- Tocolytics: Medications that stop contractions/labor.
- Terbutaline:
- Side Effect: Increases the mother’s heart rate.
- Magnesium Sulfate (MgSO₄):
- Induces hypermagnesemia, which causes everything to slow down.
- Side Effects: Decreased heart rate, blood pressure, reflexes, respiratory rate, and level of consciousness.
- Nursing Intervention for Hypermagnesemia:
- Monitor Respiratory Rate: If it falls below 12 breaths per minute, decrease the MgSO₄ dose.
- Assess Reflexes: Normal reflexes are 2+. If reflexes are 0 or 1+, decrease the dose. If reflexes are 3+ or 4+, increase the dose.
- Terbutaline:
- Oxytocics: Medications that stimulate and strengthen labor.
- Oxytocin (Pitocin):
- Side Effect: Can cause uterine hyperstimulation, defined as contractions lasting longer than 90 seconds or occurring less than 2 minutes apart. If this happens, the nurse should lower the oxytocin dose.
- Methergine:
- Side Effect: Causes hypertension by contracting blood vessels, which increases blood pressure.
- Oxytocin (Pitocin):
- Medications for Fetal Lung Maturity:
- Betamethasone (steroid):
- Given to the mother IM before birth to speed up fetal lung maturity.
- Can be repeated as long as the baby is in utero.
- Side Effect: Increases blood glucose levels (as with other steroids).
- Surfactant:
- Given to the baby after birth to help the lungs function.
- Administered via transtracheal route.
- Betamethasone (steroid):
Medication Helps and Hints
Humulin 70/30:
- This is a mix of 70% NPH (intermediate-acting insulin) and 30% Regular insulin.
- Example: If you administer 100 units of 70/30, the patient receives 70 units of NPH and 30 units of Regular.
- For 50 units, the patient would receive 35 units of NPH and 15 units of Regular.
- Remember: N (NPH) goes in the numerator (70%).
Mixing Insulin in the Same Syringe:
- Yes, insulin can be mixed in the same syringe.
- Use the “NRRN” method:
- Draw up the total dose of air.
- Pressurize the NPH (N) vial by injecting air into it.
- Pressurize the Regular (R) vial by injecting air into it.
- Draw up the Regular insulin dose.
- Draw up the NPH dose.
Needles for Insulin Injections:
- IM Injection:
- Pick the answer with a “1” in both the gauge and needle size, as “I” in IM looks like a “1”.
- Use a 21 gauge, 1-inch needle.
- Subcutaneous Injection:
- Pick the answer with a “5” in both the gauge and needle size, as “S” in SQ looks like a “5”.
- Use a 25 gauge, 0.5-inch needle.
Heparin vs. Warfarin
| Heparin | Warfarin (Coumadin) |
| Administration: Given either IV or SubQ. Onset: Heparin works immediately after administration. Duration: Heparin is not given for more than 3 weeks, except for Lovenox (enoxaparin), which can be given for a longer duration. -After 21 days, the body may start producing antibodies against heparin, which can be life-threatening. Therefore, it is generally not given beyond 21 days. Antidote: Protamine Sulfate. Monitoring: Heparin is monitored through PTT (Partial Thromboplastin Time). Pregnancy: Heparin is classified as a Category C medication and can be used during pregnancy. | Administration: Given only PO (orally). Onset: Takes a few days to a week to take effect (typically around 4-5 days). Duration: Can be used lifelong as needed. Antidote: Vitamin K. Monitoring: Monitored through PT/INR (Prothrombin Time/International Normalized Ratio). Pregnancy: Cannot be used during pregnancy (Class X medication). –Note: The only antipsychotic that can be given during pregnancy is haldol. |
Diuretics
- K-Wasting vs. K-Sparing Diuretics:
- Diuretics ending in “X”, “-mides”, or Diuril cause K+ (potassium) wasting—they cause potassium to “eXit” the body.
- Examples: Lasix (furosemide), Bumex (bumetanide), Clotrix, Diuril (chlorothiazide), hydrochlorothiazide = K-wasting.
- If a diuretic does not end in “X”, it is K-sparing.
- Examples: Spironolactone, amiloride, triamterene = K-sparing.
- Diuretics ending in “X”, “-mides”, or Diuril cause K+ (potassium) wasting—they cause potassium to “eXit” the body.
Muscle Relaxants: Baclofen (Lioresal) and Cyclobenzaprine (Flexeril)
- These are the two muscle relaxants to know for the NCLEX.
- Common Side Effects:
- Fatigue/drowsiness.
- Muscle weakness (paresis).
- Patient Teaching – 3 Key Points:
- Don’t drink alcohol.
- Don’t drive.
- Don’t operate heavy machinery.
Piaget’s Theory of Cognitive Development – 4 Stages
Piaget’s stages of cognitive development overlap with toy appropriateness based on age, but do not confuse these two concepts!
- Sensorimotor Stage (0-2 years)
- At this stage, children are focused on what they are sensing right now.
- They only understand things in the present tense.
- Teaching Strategy: Explain things as they are happening—there is no concept of past or future for them.
- Example: If a 19-month-old is about to undergo a lumbar puncture (LP), you should explain what is happening while it is happening. There is no preoperative teaching for children at this age—pre-op teaching is only for the parents.
- Pre-operational Stage (3-6 years)
- Children at this age are fantasy-oriented, imaginative, and illogical. Their thinking does not follow logical rules.
- They understand past and future tenses but are highly imaginative.
- Teaching Strategy: Teach closer to the event, about 2 hours before the procedure. Don’t give too much time for them to imagine worst-case scenarios. Explain what will happen using simple explanations, and they may learn through play.
- Example: If a 3-year-old is scheduled for an LP, explain the procedure the morning of or just a couple of hours before it happens.
- Concrete Operational Stage (7-11 years)
- Think of concrete as solid, like a 7/11 store surrounded by concrete, no room for imagination. Children in this stage are rule-oriented and unable to think abstractly.
- They see the world in black-and-white: there is only one right way to do things.
- Teaching Strategy: Teach 1-2 days before the procedure. Use age-appropriate reading materials and demonstrations.
- Example: For an 8-year-old scheduled for an LP, explain the procedure 1-2 days in advance using demonstrations or hands-on practice.
- Formal Operational Stage (12+ years)
- Children can think abstractly and understand cause and effect.
- At this stage, teach them as you would teach an adult.
- Teaching Strategy: Since they can reason and understand consequences, you can explain medical procedures or care as you would for an adult.
- Example: A 12-year-old can be taught about an LP just like you would teach an adult patient.
- Managing Their Care: The first age at which a child can begin to manage their care (make decisions requiring abstract thinking) is 12 years old.
7 Principles to Follow When Taking Psychiatric Tests
- Know the Phase of the Nurse-Patient Relationship
- Be aware of whether you’re in the orientation, working, or termination phase of the relationship, as this will affect how you respond to the patient.
- Don’t Give or Accept Gifts in Psych
- Gifts can be easily misunderstood, especially in psychiatric settings.
- Example: For a schizophrenic patient, giving flowers could be misinterpreted as a proposal.
- Gifts can be easily misunderstood, especially in psychiatric settings.
- Don’t Give Advice
- If a patient asks, “What do you think I should do?”, avoid giving direct advice.
- Response: Turn the question back to them: “What do you think you should do?”
- Never Give Guarantees
- Avoid making promises or guarantees like “If you cry, you’ll feel better.”
- Avoid phrases like: “If you ____, then you will ____.”
- Immediacy
- If you’re stuck between two answer choices, choose the one that encourages the patient to keep talking.
- Avoid referring to someone else or delaying action.
- Concreteness
- Psychiatric patients often take things literally, so avoid using slang or figurative language.
- Avoid phrases like: “Chill out” or “What goes around comes around.”
- Psychiatric patients often take things literally, so avoid using slang or figurative language.
- Empathy = Acknowledging Feelings
- Empathy means acknowledging and accepting the patient’s feelings.
- Avoid responses that dismiss or invalidate their emotions.
- Avoid phrases like: “Don’t you worry…” or “You shouldn’t feel that way…”
- Better response: “That sounds really upsetting.”
4 Steps to Answering Empathy Questions
- Look for the Quote: Empathy questions will always include a quote from the patient.
- Role-Play the Feelings: Put yourself in the patient’s shoes and imagine saying the words. How would you feel?
- Ask Yourself: “If I said these words, how would I be feeling right now?”
- Choose the Answer: Select the answer that reflects the patient’s feelings, not just the words they said.
Kids’ Toys
3 Key Questions to Always Ask:
- Is it SAFE?
- Is it AGE APPROPRIATE?
- Is it FEASIBLE? (Can the child easily and conveniently play with it?)
Safety Considerations:
- NO SMALL TOYS for children under 4 years old (they could put them in their mouths and risk aspiration).
- NO METAL TOYS (like die-cast) if oxygen is in use, due to the risk of sparks.
- BEWARE of FOMITES (objects that can harbor microorganisms).
- Worst toys for fomites: Stuffed animals (hard to clean).
- Best toys for fomites: Hard plastic toys (easy to disinfect).
- Best toy for an immunosuppressed child: Hard plastic toys (can be easily disinfected).
Feasibility Considerations:
- Can the child actually use the toy given their condition or limitations?
- Example: Swimming is generally safe and age-appropriate for a 13-year-old, but not feasible if the child is in a body cast.
Age-Appropriate Toy Considerations:
- Infants 0-6 months:
- Best toy: Musical mobile (stimulates motor and sensory development).
- Second-best toy: Something soft and large.
- Infants 6-9 months:
- Focus: Object permanence (the understanding that objects still exist even when out of sight).
- Best toy: Cover/uncover toys (peek-a-boo, Jack-in-the-Box, etc.).
- Second-best toy: Something large and hard.
- Worst toy: Musical mobile (as infants can sit up and reach it, posing a strangulation hazard).
- Infants 9-12 months:
- Focus: Vocalization.
- Best toy: Speaking toys (Talking dolls, Tickle Me Elmo, See & Say, etc.).
- They also need purposeful activity.
- Never pick these options for children under 9 months: build, sort, stack, make, construct—these involve purposeful activity, which infants are not yet ready for.
- Toddlers (1-3 years):
- Focus: Gross motor skills (running, jumping).
- Best toy: Push/pull toys (lawn mowers, baby strollers, etc.).
- No fine motor skills yet (e.g., can’t color or use scissors).
- Finger painting is acceptable because it uses the whole hand.
- Toddlers engage in parallel play (playing alongside others but not with them).
- Preschoolers:
- Focus: Fine motor skills (finger dexterity) and balance (e.g., tricycles, dance classes, ice skates).
- Characterized by cooperative play (playing together in groups).
- Preschoolers love to pretend and are highly imaginative.
- School-age children:
- Characterized by the 3 C’s:
- Creative: Enjoy activities like drawing on blank paper with colored pencils.
- Collective: Love to collect items (stamps, cards, etc.).
- Competitive: Enjoy games where they can win or lose.
- Characterized by the 3 C’s:
- Adolescents:
- Focus on peer group association (hanging out with friends).
- Can a group of 5-8 adolescents hang out in a room together?
- Yes, unless:
- One of them is less than 12 hours post-op.
- One of them is immunosuppressed.
- One of them has a contagious disease.
- Yes, unless:
