This chapter tells you how to get yourself and your motorcycle or moped ready to drive. This includes being in good physical and mental condition; wearing a helmet and the proper clothing; knowing your vehicle and its controls; and making sure your vehicle is safe to drive.
Get into the Right Frame of Mind
Driving a motorcycle or moped is different from driving a car or any other kind of vehicle. It takes your full concentration and attention to remain safe and in control. This means that you need to be in good physical and mental condition. Do not drive when you are sick, injured, tired, upset or impaired in any way. You need to be calm, alert and focused every time you drive.
Avoid Drugs and Alcohol
Drinking alcohol increases your chances of having a collision. Alcohol can begin to affect your ability to handle your motorcycle safely at blood-alcohol levels far below the legal limit. Your balance, steering, speed control and distance perception may be off. Because alcohol also clouds your judgment, you may not recognize these symptoms of impairment until it is too late.
Besides alcohol, almost any drug can affect your ability to drive a vehicle safely. This includes illegal and prescription drugs. It even includes non-prescription drugs such as cold tablets or allergy pills. These drugs can leave you weak, dizzy or drowsy. Make sure you know the effects of any drug before you drive. If you feel dizzy or weak while driving, stop and wait until you feel normal.
Cellphones
Cell phones can be an important safety aid for drivers, but using a cell phone while riding takes a driver’s attention away from the task of driving and increases the risk of collision. Viewing display screens unrelated to driving is prohibited while driving. Distracted drivers are more likely to make mistakes or react too slowly. A driver who talks, texts, types, dials or e-mails using hand-held cellular phones and other hand-held communications and entertainment devices faces a large fine and demerit points applied to their driver’s record under Ontario’s distracted driving law.
Stay Calm and Alert
Do not drive when you are tired. You might fall asleep while driving, risking your own life and the lives of others on the road. Even if you do not fall asleep, fatigue affects your ability to perceive and react to emergencies. Your thinking slows down and you miss seeing things. In an emergency, you may make the wrong decision or you may not make the right one fast enough. It is also important not to drive when you are upset or angry. Strong emotions can reduce your ability to think and react quickly. Be especially careful not to fall victim to road rage, or you could find yourself in a vulnerable and dangerous position.
Wear a Helmet
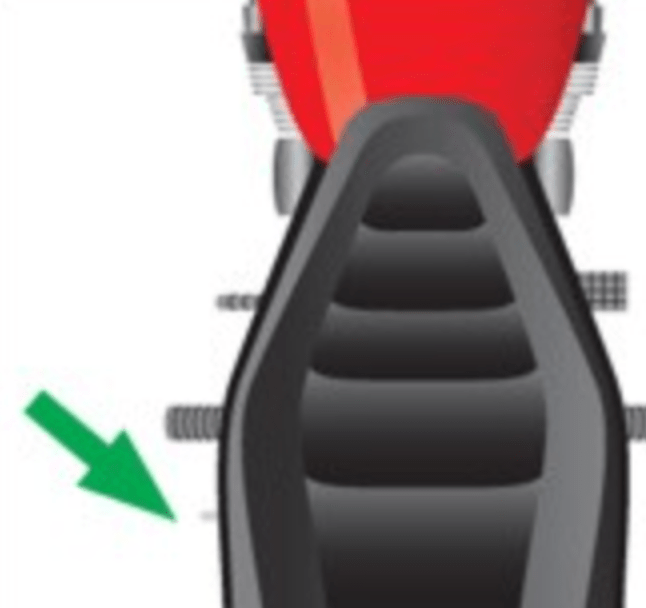
A helmet is the most important motorcycle or moped accessory you can have. Wearing a helmet can protect you from serious head injury. Ontario law requires you and your passenger to wear approved helmets with the chin strap securely fastened every time you drive a motorcycle or moped.
An approved helmet is one that meets standards approved for use in Ontario. It must have a strong chin strap and fastener, and be in good condition. Approved helmets come in a variety of styles and prices. It is important to choose one that is well constructed and will protect you. A full-faced helmet offers the best protection and the most comfort. A helmet with bright colours and reflective devices may make you more visible to other drivers.
Make sure your helmet fits snugly and does not slide around on your head. Always keep the strap securely fastened. Studies of motorcycle collisions show that a loose helmet will come off in a collision.
Besides protecting you from head injury, a helmet can make you more comfortable when driving because it reduces the noise of the road and keeps the wind, bugs and other debris from blowing in your face.
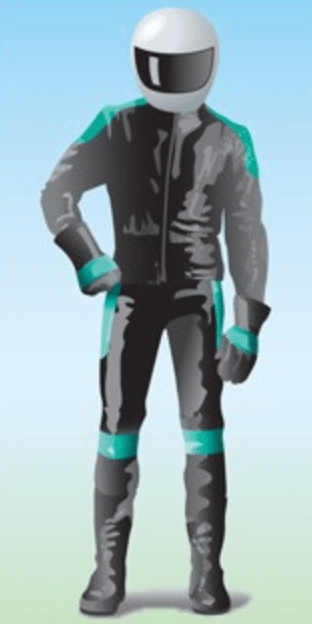
Wear Protective Clothing
Protective clothing can help protect you from injury in a fall or collision and from the impact of wind, rain, insects, stones and debris. It can also help reduce fatigue by keeping you warm in bad weather. Bright colours and reflective items, such as a safety vest, make you more visible to other drivers on the road.
Wear a jacket and pants that cover your arms and legs completely, even in warm weather. Leather offers the best protection, but riding suits made of special synthetic materials, can also give you a lot of protection.
Your clothes should fit snugly enough to keep from flapping but still let you move freely. Consider wearing protective equipment such as back protectors, kidney belts and body armour as inserts in your protective clothing.
In cold or wet weather, your clothes should keep you warm and dry as well as protect you from injury. Driving for long periods in cold weather can cause severe chill and fatigue. Rain suits should be one piece and brightly coloured. Those not designed for motorcycle use may balloon out and allow wind and water to enter when driving at freeway speeds. A winter jacket should resist wind and fit snugly at neck, wrists and waist. Layer your clothes for extra warmth and protection.
Choose boots that are sturdy and high enough to protect your ankles. Soles should be made of hard, durable material that will grip the pavement when you are stopped. Heels should be short so they will not catch on rough surfaces. Avoid shoes with rings or laces that may catch on the motorcycle’s controls.
Gloves are also important in both cold and warm weather. They give you a better hold on the handgrips and controls. Gauntlet gloves that extend over your wrists are recommended because they protect your wrists, as well as your fingers and knuckles. Look for sturdy leather gloves designed for motorcycle use.
Know your Vehicle
The first step in learning to drive a motorcycle or moped is to learn where the controls are and what they do. Motorcycles and mopeds are designed so that all the controls are within quick reach of your hands and feet. However, the same control may not be in the same place on all vehicles. Also, some types of mopeds have different controls than motorcycles. Become familiar with your vehicle’s controls. Check the owner’s manual for the exact location and precise method of operation of all controls.
You need to know the controls well enough that you can reach them without taking your eyes off the road. With practice, you will be able to operate all controls by reflex. This automatic response is required before you can begin to drive in traffic.
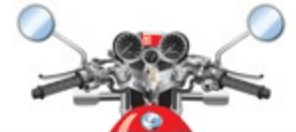
Primary Controls
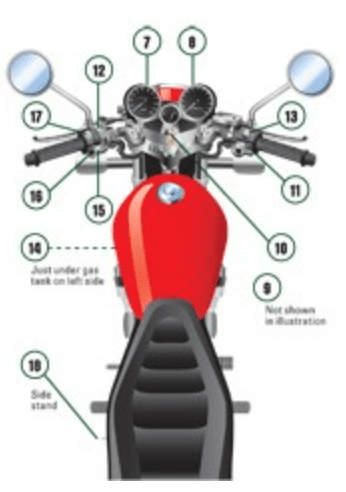
The following six controls are the most important controls you will use to operate your motorcycle or moped:
- Handlebars
- Throttle
- Front brake lever
- Rear brake lever
- Clutch lever
- Shift lever
This illustration is intended only as a guide. Controls and their positions may be different on your vehicle. Some motorcycles and mopeds do not have clutch or shift levers.
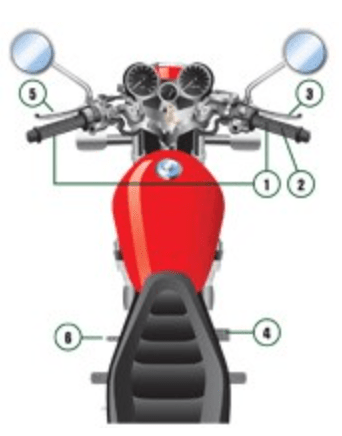
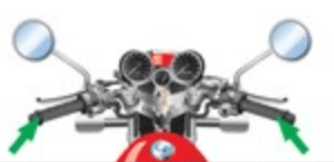
1. Handlebars
These are the two bars you hold to control the motorcycle’s direction. Many of the other controls are grouped on or around the handlebars.
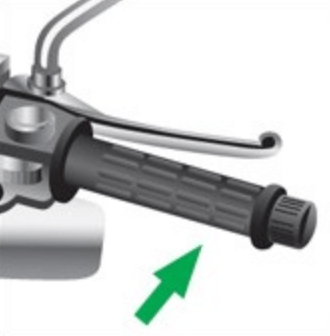
2. Throttle
Twist the right handgrip to operate the throttle. This controls the motorcycle’s speed by controlling the flow of fuel to the engine. To speed up, twist the throttle toward you. To slow down, twist it away from you. The throttle should spring back completely to the idle position when you let go.
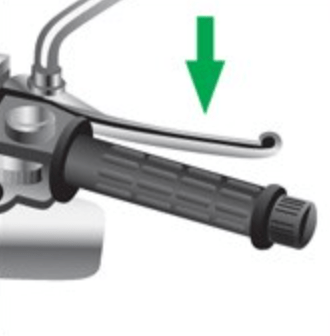
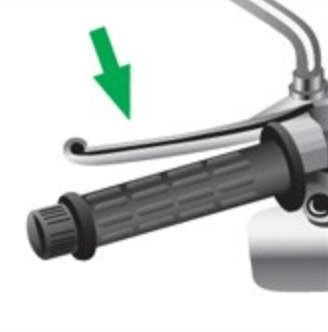
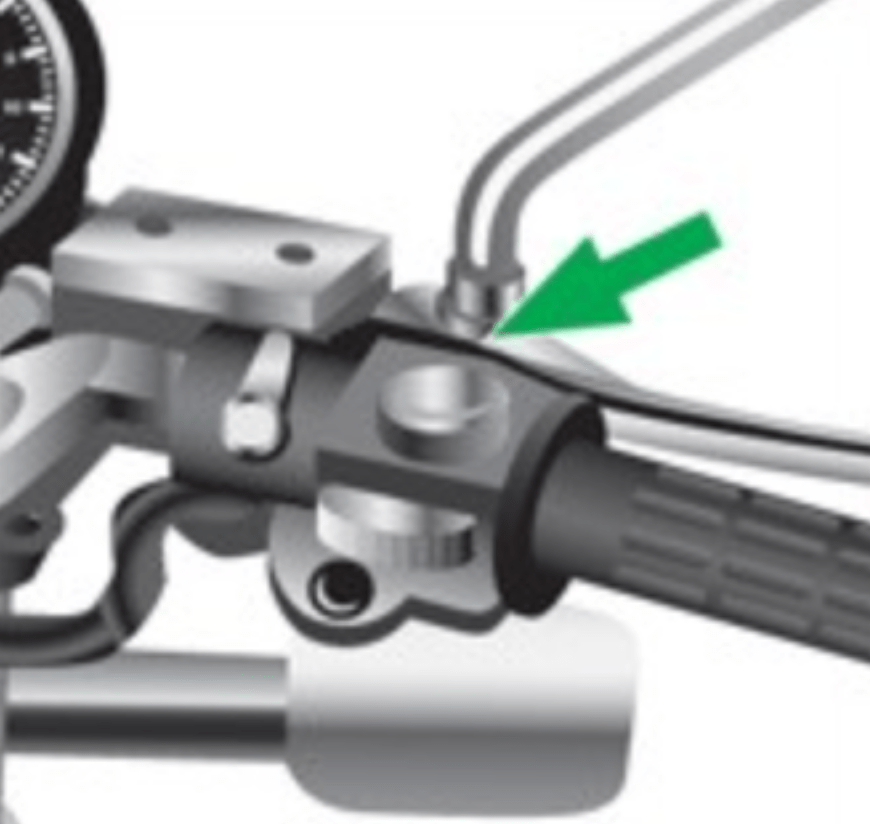
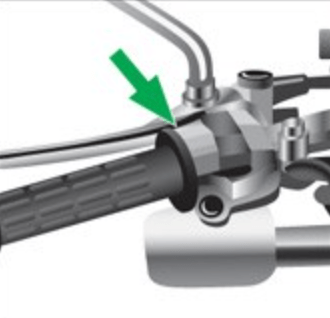
3. Front brake lever
The front brake lever is on the right handlebar in front of the throttle. You squeeze the lever toward the handgrip to apply the brake to the front wheel. Use the front and rear brakes together.
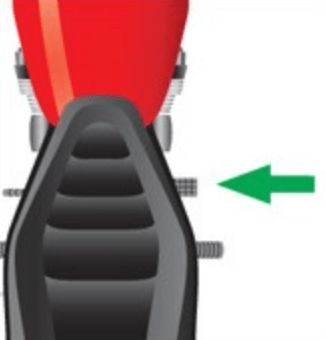
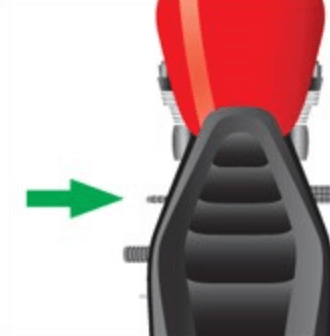
4. Rear brake lever
The rear brake lever is near the right foot rest. Press your foot on the lever to apply the brake to the rear wheel. Use the front and rear brakes together. If your motorcycle has a clutch and gears, remember that although the engine will act as a brake when you gear down or reduce throttle, your brake lights will not turn on and other drivers may not know you are slowing down. Always apply your brakes as a signal to others that you are slowing down.
5. Clutch lever
The clutch lever is on the left handlebar. It controls the clutch and is used to help shift gears. Squeeze the lever toward the handgrip to disengage the clutch; release it to engage the clutch. Whenever you change gears, you must first disengage the clutch. Try to co-ordinate the movements of clutch and throttle to change gears smoothly. Most limited-speed motorcycles and mopeds have an automatic clutch lever.
6. Shift lever
The shift lever is near the left footrest. It shifts the transmission’s gears. The shift lever should only be used when the clutch is disengaged. Select the gear you need by lifting or pressing the lever with your foot. Most motorcycles have five or six forward gears and a neutral position.
Secondary Controls
There are a number of secondary controls that you will need to use to operate a motorcycle or moped effectively. Here are some of the most important ones:
- Speedometer
- Tachometer
- Indicator lights
- Ignition switch
- Starter
- Choke
- Engine kill switch
- Fuel-supply valve
- Turn signals switch
- Horn button
- Light switches
- Stands
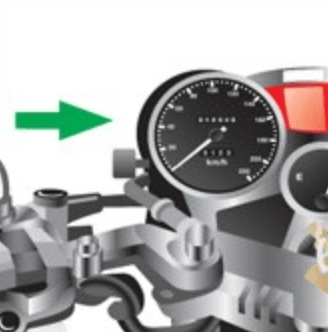
7. Speedometer
The speedometer shows the speed you are driving in kilometres per hour or miles per hour.
8. Tachometer
The tachometer shows the number of revolutions your engine is turning per minute (). A red line shows the maximum rpm that is safe for the engine.

9. Indicator lights
The high-beam light glows red or blue when the highbeam headlight is on. The neutral light glows green when the transmission is in neutral gear. And the turn signal light flashes yellow when the left or right turn signal is on.
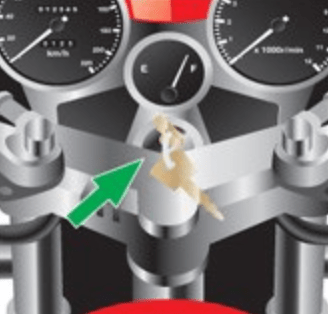
10. Ignition switch
The ignition switch turns the ignition system on and off. The ignition switch is separate from the starter; you do not turn the key to start a motorcycle like you do a car. Ignition switches have “on” and “off” positions and some also have “lights,” “lock” and “park” positions.
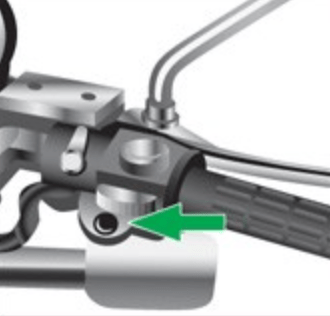
11. Starter
Most motorcycles have electric starters. To start, make sure your motorcycle is in neutral and that the clutch is depressed. Push the starter button on the right handlebar near the throttle. Some motorcycles have a kick-start lever, usually above the right footrest. It must be unfolded and kicked downward to start the motorcycle.
Most mopeds require you to pedal in order to start the engine.
12. Choke
This is a lever or knob, usually on the handlebars, that is used to help start the motorcycle by adjusting the mixture of gasoline and air supplied to the engine. It is used when starting a cold engine.

13. Engine kill switch
The engine kill switch is used in an emergency to stop the engine quickly. It may also be used to turn off the engine after a normal stop, but be sure to turn off the ignition switch as well. The engine will not start when the kill switch is in the “off” position. Some older model motorcycles and mopeds do not have a kill switch.
14. Fuel supply valve
The fuel supply may be controlled by a manually operated valve, or petcock, which controls the flow of gasoline to the engine. When the vehicle is not in use, this valve should be turned off to avoid a fire hazard. The fuel tank may also have a manually selected reserve supply in case the main section runs dry. To release the reserve fuel, you must turn the valve to reserve. Many newer model motorcycles do not have manual fuel-control valves.
15. Turn signals switch
Many motorcycle and moped turn signals do not automatically switch off after a turn is completed. You must manually switch off the signal after each turn or lane change. Forgetting to turn off your signal is as dangerous as not signalling in the first place, because it may cause other drivers to pull out or turn in front of you.
16. Horn button
Your motorcycle or moped must have a horn that works. Most horns are operated by pushing a button with your thumb.
17. Light switches
On most modern motorcycles and mopeds, the headlight and tail light come on automatically when the ignition is switched on and the engine is running. The switch to turn the headlight from low beam to high beam is usually on the left handlebar and operated by the thumb.
18. Stands
A kickstand or centre stand holds a motorcycle or moped upright when it is parked. Some larger motorcycles have both a kickstand and a centre stand. A kickstand extends from the left side of the vehicle and the vehicle leans against it. A centre stand is attached underneath the centre of the frame and holds the vehicle upright. Stands are operated by spring mechanisms and should only be used on a hard surface. Always make sure to completely raise your stands before driving away.
Do a Pre-Vehicle Check
Motorcycles and mopeds require more attention and upkeep than cars, since the consequences of something going wrong are usually much more severe when on a motorcycle than while driving a car. You should always check the condition of the vehicle before you drive it. Here are the things you should check every time before you drive a motorcycle or moped:
Tires
The proper tires are important for good traction, mileage and safety. Check your tires for the following:
- Pressure – Proper tire pressure means safer driving and longer-lasting tires. Use an air-pressure gauge to check the pressure when the tires are cold. If you do not know what your tire pressure should be, check the owner’s manual or with the manufacturer.
- Tread – Worn or uneven tread can make the vehicle skid, particularly on wet pavement.
- Damage – Check for cuts or nails stuck in the tread. Also, check for wear, bulges or cracking. A blowout on a motorcycle can be extremely dangerous.
Controls
Make sure all levers, pedals and switches are in good condition and operate properly. They should spring back to the original position when you let go.
Brakes
Try the front and rear brakes one at a time. Make sure each one holds the motorcycle or moped when it is fully applied. It is especially important to test the brakes of a motorcycle or moped you are unfamiliar with or have never ridden before.
Chassis
Check for loose bolts.
Cables
Check for kinks, binding or broken strands.
Lights
The headlight(s) must shine a white light. The rear or tail light(s) must be red. A white light must shine on the licence plate. Keep your lights clean and check that all are working before you drive away.
Fuel and Oil
Check levels.
Stands
Check springs.
Adjust your Mirrors
Clean and adjust both mirrors before you start. It is dangerous to try to adjust a mirror while driving. Swing mirrors outward far enough to see around your own body. Adjust each mirror so that it lets you see about half the lane behind you and as much of the lane beside you as possible. Reduce your blind spot as much as possible. If your motorcycle or moped has convex mirrors, note that convex mirrors make other vehicles look farther away than they really are. Remember that checking your mirrors is not a substitute for looking over your shoulder.
Turn on your Headlight
All motorcycles must have a white light at the front (headlight) and a red light at the back (rear or tail light) and these must be used at all times of day and night.
When driving a moped, headlights and tail lights (or a rear reflector) are required to be used between one-half hour before sunset and one-half hour after sunrise, and any other time of poor light conditions, such as fog, snow or rain, which keeps you from clearly seeing people or vehicles less than 150 metres away. It is recommended that your moped’s full lighting system be turned on at all times to enhance your safety and the safety of others. In addition, mopeds are required to have white reflective material on the front forks and red reflective material on the back forks.
Summary
By the end of this chapter, you should know:
- The importance of being mentally and physically prepared to drive
- The type of helmet and protective clothing to wear when riding
- The primary and secondary controls of a motorcycle and how to operate them
- Motorcycle components to be checked before every trip
- How to use your mirrors and headlight for optimal vision and visibility
